
Automatic Maintenance is designed to address these problems with maintenance activity in windows. They are Deadline Scheduling, Resource Utilizing conflicts, Energy Efficiency and Transparency to the user. This feature of windows facilitates idle efficiency and permits all activity to run in a timely and prioritized fashion.
Windows could run (when opted for) a schedule check on to your system whenever you are not using your system on a daily basis. Windows do this so that it could check for updates related to windows, software installed on your system. System diagnostics and Security scanning could also be done along with the “Updates”.
How to Customize Automatic Maintenance in Windows 10
Automatic Maintenance automatically stops currently running maintenance activities if the user starts interacting with the computer. This will resume its activity when the system returns to idle status. However, in case of deadlines, a user will be notified about the activity and provide an option for a manual run of automatic maintenance.
Here in this article, we will tell you on how to adjust the automatic maintenance settings so that your system wakes up at some particular time (fixed by you) checks for daily maintenance tasks. Note that to make any change on to your system, you need to login as an administrator so that you have the full rights.
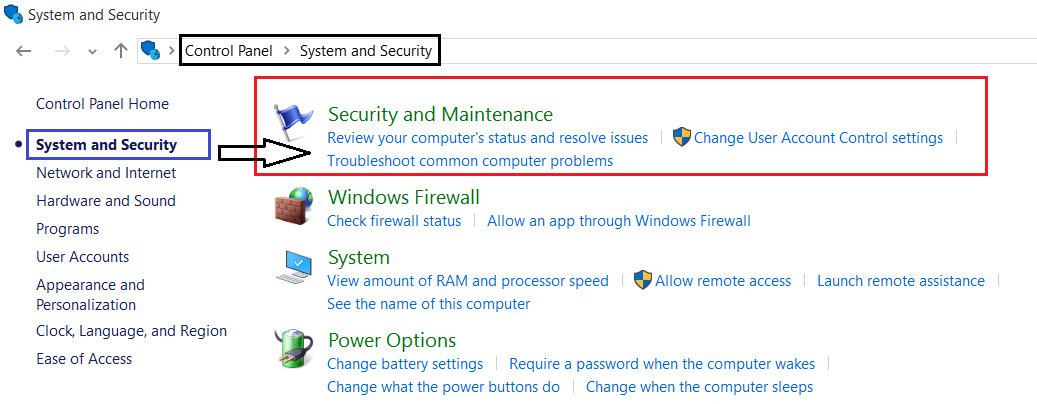
Step 1: At first, you need to open the System and Security. You can access System and Security either by Control Panel or through the system settings. Here, in this article, we will see to open this through Control panel as this is the easiest way to access it. Look at the screenshot shown below and follow the exact path i.e. Control Panel >>System and Security.
 Step 2: Here, in this window go straight to the System and Security and click on Security and Maintenance. This will open up a new window. A screenshot of this is shown below. Here, go to the Maintenance option. There is a drop down menu present at the right end of maintenance. Click on here to expand it.

Step 3: This will open the Automatic Maintenance section of your system. Here, go to the bottom and tick against the box which will allow scheduled maintenance to wake up your computer at the scheduled time. You can select the scheduled time for your system yourself. By default the automatic scheduled is set at 2 AM. A screenshot of this is shown below.
 If you are prompted by UAC, simply click on OK and move forward. That’s it. If you have any other query regarding Windows 10, ask us in the comment box below
Windows could run (when opted for) a schedule check on to your system whenever you are not using your system on a daily basis. Windows do this so that it could check for updates related to windows, software installed on your system. System diagnostics and Security scanning could also be done along with the “Updates”.
How to Customize Automatic Maintenance in Windows 10
Automatic Maintenance automatically stops currently running maintenance activities if the user starts interacting with the computer. This will resume its activity when the system returns to idle status. However, in case of deadlines, a user will be notified about the activity and provide an option for a manual run of automatic maintenance.
Here in this article, we will tell you on how to adjust the automatic maintenance settings so that your system wakes up at some particular time (fixed by you) checks for daily maintenance tasks. Note that to make any change on to your system, you need to login as an administrator so that you have the full rights.
How to adjust Automatic Maintenance Settings in Windows 10
Step 1: At first, you need to open the System and Security. You can access System and Security either by Control Panel or through the system settings. Here, in this article, we will see to open this through Control panel as this is the easiest way to access it. Look at the screenshot shown below and follow the exact path i.e. Control Panel >>System and Security.
Step 2: Here, in this window go straight to the System and Security and click on Security and Maintenance. This will open up a new window. A screenshot of this is shown below. Here, go to the Maintenance option. There is a drop down menu present at the right end of maintenance. Click on here to expand it.Step 3: This will open the Automatic Maintenance section of your system. Here, go to the bottom and tick against the box which will allow scheduled maintenance to wake up your computer at the scheduled time. You can select the scheduled time for your system yourself. By default the automatic scheduled is set at 2 AM. A screenshot of this is shown below.
If you are prompted by UAC, simply click on OK and move forward. That’s it. If you have any other query regarding Windows 10, ask us in the comment box below
No comments:
Post a Comment