
When the search function is handling incorrectly on your system, then it will begin to return with broken results. Typing some keywords on your taskbar search bar and clicking on the first link which appears in the search window, would let you go nowhere or to the wrong places in your PC.
Search Function is considered to be one of the nicest features of windows 10. It not only helps you in navigating through your Whole system in a quicker way but also let you search any file or folder using their extension name only. If this feature is not working properly on your PC, you should try to rebuild the search index of your system.
How to Customize Search from Settings App in Windows 10
Here, in this article we will tell you how to rebuild your search index in Windows 10.
Things to be noted before rebuilding
If your search bar is working even slightly fine, you can access "Indexing Options" just by typing it on the search bar. However, the possibility of getting this is very less as we are going to fix a search function which is already broken. Anyway, it does work then you can simply go the third step and follow further from there otherwise, you have to start from first step.
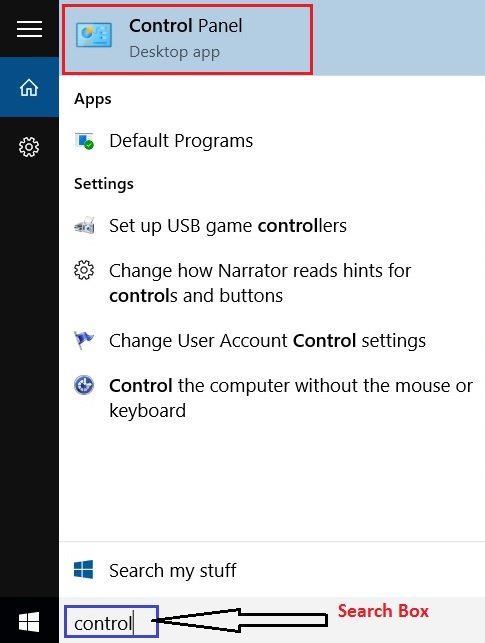
Step 1: At first go to the Taskbar search of Windows 10 and write Control. An icon named Control Panel will be shown here on the top. Click on this desktop app. A screenshot of this is shown below. Note: As we are trying to fix the problem related to the search box, it might happen that you don't get access to the Control Panel by using Cortana Search. In such a scenario, all you have to do is to right-click on the start menu. This will open a new window. Scroll down to search for Control Panel here on this window.
Step 2: Indexing Options has not made its way to the new Universal App for Settings and still resides in the traditional Control Panel. Therefore, you need to go inside the Control Panel to All Control Panel Items. To access this, go to the topmost right corner. There you will see a “View by” option. Select the drop-down menu and select “Large icons “as shown in the screenshot below. Here, look out for the Indexing option. Click on Indexing Options to open its dialogue box.
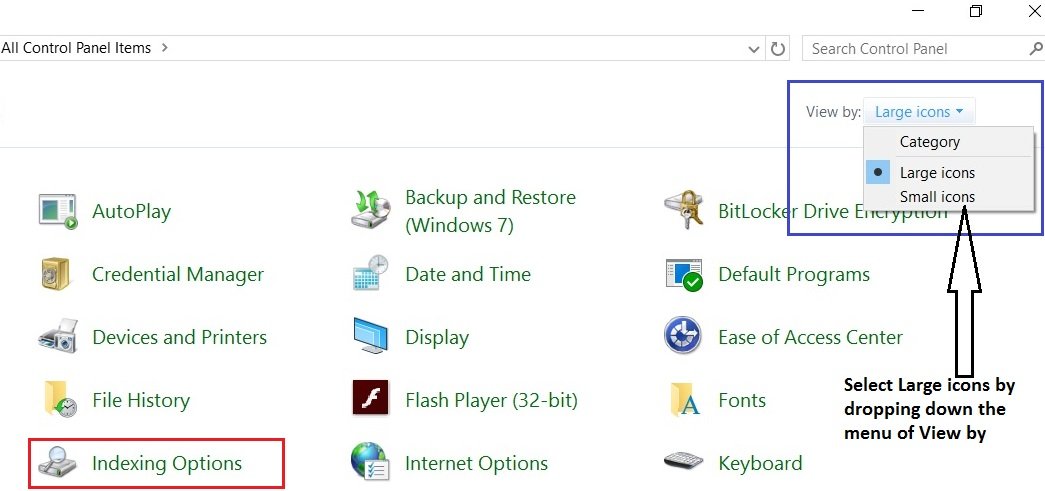
Note: Control panel should be arranged by Large Icons instead of Category.
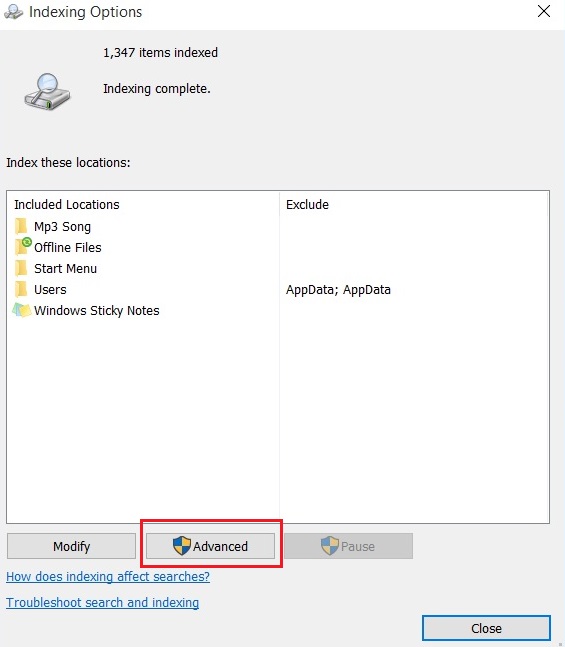
Step 3: In its dialogue box, look out for Advanced and click on it once found. You need to have the administrative right for opening this tool.
Step 4: Now, in the advanced dialogue box select rebuild. Selecting Rebuild will begin the process of deleting and then rebuilding your PC’s search index, remember this is a time consuming process. Therefore, I suggest you perform this action only in your leisure time.

That’s it. Freshly rebuilt index will be started automatically on your PC once the rebuilding process is completed on your system. Navigating through Windows 10 becomes quite easy and smoother after this rebuilding process. If you have any query related to Windows 10, you can ask us in the comment box below.
Search Function is considered to be one of the nicest features of windows 10. It not only helps you in navigating through your Whole system in a quicker way but also let you search any file or folder using their extension name only. If this feature is not working properly on your PC, you should try to rebuild the search index of your system.
How to Customize Search from Settings App in Windows 10
Ways to Rebuild your Search Index in Windows 10
Here, in this article we will tell you how to rebuild your search index in Windows 10.
Things to be noted before rebuilding
- Initiating the rebuilding process is quite easy and simple. It takes a few seconds to perform the whole task externally. However, the actual process which does get started after pressing the "rebuilding process" can take pretty much time depending on how much data you have on your PC and let your windows index it.
- Once you click on the "rebuilding process", windows will alert you with the message "rebuilding process will take pretty good time depending on your data to be indexed by Windows”. Note that some of the views and search results would not be complete unless this process of rebuilding is done.
If your search bar is working even slightly fine, you can access "Indexing Options" just by typing it on the search bar. However, the possibility of getting this is very less as we are going to fix a search function which is already broken. Anyway, it does work then you can simply go the third step and follow further from there otherwise, you have to start from first step.
Step 1: At first go to the Taskbar search of Windows 10 and write Control. An icon named Control Panel will be shown here on the top. Click on this desktop app. A screenshot of this is shown below. Note: As we are trying to fix the problem related to the search box, it might happen that you don't get access to the Control Panel by using Cortana Search. In such a scenario, all you have to do is to right-click on the start menu. This will open a new window. Scroll down to search for Control Panel here on this window.
Step 2: Indexing Options has not made its way to the new Universal App for Settings and still resides in the traditional Control Panel. Therefore, you need to go inside the Control Panel to All Control Panel Items. To access this, go to the topmost right corner. There you will see a “View by” option. Select the drop-down menu and select “Large icons “as shown in the screenshot below. Here, look out for the Indexing option. Click on Indexing Options to open its dialogue box.
Note: Control panel should be arranged by Large Icons instead of Category.
Step 3: In its dialogue box, look out for Advanced and click on it once found. You need to have the administrative right for opening this tool.
Step 4: Now, in the advanced dialogue box select rebuild. Selecting Rebuild will begin the process of deleting and then rebuilding your PC’s search index, remember this is a time consuming process. Therefore, I suggest you perform this action only in your leisure time.
That’s it. Freshly rebuilt index will be started automatically on your PC once the rebuilding process is completed on your system. Navigating through Windows 10 becomes quite easy and smoother after this rebuilding process. If you have any query related to Windows 10, you can ask us in the comment box below.
No comments:
Post a Comment