Screen Saver comes into existence whenever your system becomes idle for a specified time, neither selecting “too less” nor “too much” time is considered good. If you go for too little time, then your work will be disturbed and you would not focus appropriately on the thing you are working upon. Similarly, setting too much time span for your PC screen to go idle is simply a waste of this feature.
The minimum time after which your PC can go idle starts from 1 second and varies up to 24 hours. When the idle time for PC to go idle is set to zero, it won't even start the Screen Saver. Here, we will tell you how to specify set time for your PC to go idle which will control the launching of Screen Saver on your PC.
Adjust Screen Saver timeout in Windows 10
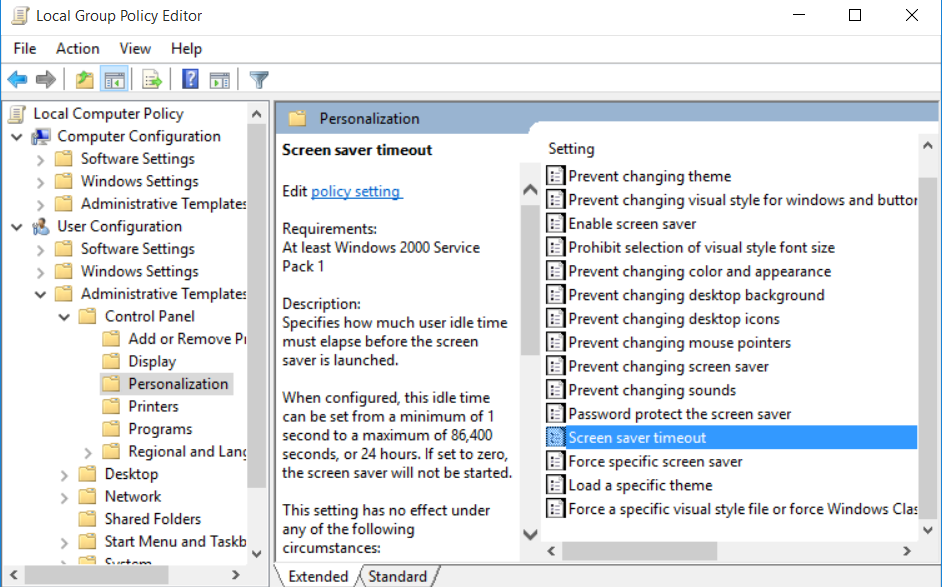
Step-1:- At first go to the taskbar search available just right to the start menu in Windows 10. Type "gpedit" here in the search box. There will new option available at the top of the search result. This is the Group Policy Editor. Click here to open this editor. A screenshot of this editor is shown below.
Step 2:- Now follow the below-written path to reach your destination.
Local Computer Policy => User Configuration => Administrative Templates => Control Panel => Personalization
This will open the personalization window. In the second half of personalization section, look out for screen saver timeout.
Step 3:- Once you found this, double click on this icon to open the edit window. You can also open its edit window by right-clicking on its icon and then selecting the “edit” in the context menu. This will open the Edit Window.
Step 4:- The default state of this setting is “Not Configured”. To select the time span for the screen saver to be launched, you need to enable a function here on this edit window. Tick against the bubble present left to the function “Enabled” in this window. You could also add some keywords in the comment box.
Step 5:- At last click on Apply and then press OK. When you hit ok, edit window will be closed and you can see the Local Group Policy Editor once again. Here, you can see the state of “Screen Saver timeout” changed to Enabled, and the keywords added in the comment box are also shown here.
This setting has no effect under any of the below-mentioned cases.
This setting has no effect under any of the below-mentioned cases.
- If the waiting time is set to zero.
- If the "enable Screen Saver" setting on your PC is disabled.
- If the status of this setting is adjusted to "not configured", the launching of Screen saver depends on the wait time set on the client using either Display Control Panel or Personalization section. The default time for this setting is 15 minutes.
The above-mentioned setting is a very interesting thing about windows 10. Try this on your own on your computer by setting an appropriate time span for your system to become idle. That’s it. If you have any other windows 10 related issues, ask us in the comment box below.


No comments:
Post a Comment