Google+

Type and Enter

Download Lastpass to use and remember strong password


A password is a sequence of characters, may be alphabet, numbers or special symbols so as to secure a user logging in to any account. It protects the individuality of any user. Usually the types of accounts that hold multi-user login, where users sign in as secure and protected single-users have their User ID. User ID is a unique name that is chosen by the user and checked by the system, so that the User IDs remains matchless and purely dedicated to that user. User IDs handle password for login so as to safeguard and verify the authentic user. Good criterion for choosing a password or generating up password guidelines include the succeeding steps:
  • Don't choose a password which someone can easily guess if they know you (for example, not your tele-phone number, birthday, or maiden name)
  • Don’t choose simple and even words, do mix different cases and characters
  • Don't choose a word that is very frequently used (as there are programs that can rapidly try every words of every day use)
  • Don't choose a word that is at present newsworthy
  • Don't opt a password that is related to your previous password
  • Don't select same passwords for one or more accounts
  • Don’t choose a password hint very close to the password.
There are networks that require you change password at regular interval. Each of us has many user IDs and passwords i.e. for emails, social networking, employee, online bank accounts, etc. Now do you think that you can always remember all the passwords? NO, then what can be done? For these reasons we have password managers.
What is a password manager?
You absolutely must use strong passwords for your secure site login, and every password needs to be different from other. The only way to manage both of these imperatives is to get help from a password manager. When you log in to a secure site, your password manager saves the username and password; when you repeat login of that site, it can fill in the saved ID. That, at its ground level, is the function of a password manager. There are many password managers, but taking into light the security and the robust nature of a password manager towards piracy and hacking. There are many password managers, over the digital world, but out of this Lastpass 2.0is the most secure, convenient, and with features that go way, way beyond the competition amongst these. Lastpass 2.0 is free to use and convenient. If you want to safeguard your passwords using Lastpass 2.0 You can follow the steps below-
  • Download the Lastpass extension for your internet browser following the link- https://lastpass.com/misc_download.php , you can download the extension for Google chrome, mozilla firefox, Microsoft internet explorer separately.
  • Then install the extension to the browser. Then get started using Lastpass.
  • First of all what you need is a ‘membership’ in the Lastpass for that you need to open an account free of cost in-
  1. The Lastpass community by opening the extension in the browser and clicking on ‘create account’.
  2. Lastpass website - https://lastpass.com
  3. you can alternatively follow the link- https://lastpass.com/create_account.php?fromloginpage=1
After downloading the Lastpass Password Manager and creating an account, you'll be able to securely store your login information, auto fill and auto login to your favorite sites, and sync your saved data across all major browsers and platforms
Read More »

How to Download Page Statistics Report of Facebook


Today, every internet visitors are familiar with Facebook. Not only Facebook is used to share expressions between friends or colleagues, but also it has become also a source of marketing rapidly. Now facebook is used to attract Facebook their posts or contents through each bloggers or other marketing firms.
As a result,they need to view whole page statistics report occasionally. Although, numerous websites or third party tools are alternate choice is available to show statistics report.
But I have searched simple and quick solution to get whole report of Facebook page statistics in few seconds without any external tools. This easy solution can be performed  via Facebook account also. Once the page report is saved on the computer, it can be viewed several times without internet.
facebook page stats report
Let’s follow tips to download Facebook page statistics report -
  • Go to your Facebook account page, hit on gear button nearby Messages option.
  • Then choose the option - View Insights from in drop-down lists.
facebook page stats report option
  • Then a new tab named Exports Insights Data appearing with various downloading format of Page Statistics report.
  • Here, choose data range between dates and any file format like XLS or CSV.
  • At last, click on Download option.
facebook page stats report download
Thus, the complete page statistics report of facebook will be saved in your preferred format immediately.
Read More »

Use of shortcuts in computer programs


USE OF SHORTCUTS IN MICROSOFT OFFICE
Microsoft Office is widely used worldwide. Microsoft Word is used for creating documents, Excel is used for creating spreadsheets, Powerpoint is used for presentations. With such wide and extensive use, there are certain features or rather certain shortcuts which can be used from the keyboard to save a lot of time. Let us see some of the general keyboard shortcuts and those used in Excel:
General Keyboard Shortcuts:
  • To Open Help: Press F1.
  • For selecting entire content in a document, window, or text box: hit Ctrl+A together on same time.
  • For searching for a file or folder: Press F3. In Windows 7, one will have to hit Windows logo key to prompt the Start menu. After that type in the Search box.
  • For renaming in a file or folder: Select the file or folder, hit F2, and then retype the name.
  • To find out information about when the file or folder was made, by whom, and it’s size: Select the file, and then press Alt+Enter.
  • To display the Start menu: Press Ctrl+Esc. In Windows 7, you can also press the Windows logo key.
  • For scrolling between open windows: Press Alt+Tab, and then hold down Alt while pressing Tab to reach the desired file or program.
  • For undoing an action: Press Ctrl+Z.
  • For redoing an action: Press Ctrl+Y.
  • For checking the spelling of titles or words in any Office application with the Spelling & Grammar checker: Press F7.
  • To create a shortcut on your desktop to your favorite file or folder: In Windows 7: Right-click the file or folder. On the shortcut menu, click Send to, and then click Desktop (Create shortcut).
  • To capture a screen shot: Press Alt+Print Screen, and then press Ctrl+C to copy and Ctrl+V to paste.
  • For locking the computer, switching users, logging off the computer, changing the password or starting the Task Manager: In Windows 7, press Ctrl+Alt+Delete.
  • To lock the computer: Press the Windows logo key + L.
  • For quitting program: Press Alt+F4
Used in Excel:
  • Open a new workbook: Press Ctrl+N.
  • Move left to right, cell by cell: Press Tab, or press the Right Arrow key.
  • Move right to left, cell by cell: Press Shift+Tab, or press the Left Arrow key.
  • Move down, cell by cell: Press Enter, or press the Down Arrow key.
  • Move up, cell by cell: Press Shift+Enter, or press the Up Arrow key.
  • Move down or up to the last empty or non-empty cell: Press Ctrl+Shift+Down Arrow or Up Arrow.
  • Move to the last empty or non-empty cell to the right or left: Press Ctrl+Shift+Right Arrow or Left Arrow.
  • Erase data in the current cell: Press Backspace.
  • Insert a return within a cell: Press Alt+Enter.
  • Return to the beginning of the row: Press HOME.
  • Advance to the next worksheet: Ctrl+Page Down
  • Go to the previous worksheet: Ctrl+Page Up
  • Enter the date: Press Ctrl+Semicolon (;).
  • Enter the time: Press Ctrl+Shift+Colon (:).
  • Find out about the style within the cell: Press Alt+Apostrophe (‘).
  • Display the Format Cells dialog box: Press Ctrl+1.
  • Apply the general number format: Press Ctrl+Shift+Tilde (~).
  • Apply the currency number format: Press Ctrl+Shift+Dollar Sign ($).
  • Apply the percentage number format
  • Press Ctrl+Shift+Percent (%).
  • Apply a border
  • Press Ctrl+Shift+Ampersand (&).
  • Remove a border
  • Press Ctrl+Shift+ underscore (_).
  • Hide the selected columns
  • Press Ctrl+0 (zero).
  • Hide the selected rows
  • Press Ctrl+9.
  • Unhide hidden rows within a selection
  • Press Ctrl+Shift+opening parenthesis.
Hope these shortcuts help you a lot in getting the work done easily. Suggestions and discussions are always welcome.
Read More »

shortcuts in Excel and IE / Internet explorer


COMMONLY USED SHORTCUTS IN MICROSOFT EXCEL AND INTERNET EXPLORER
There are various shortcuts in Excel and Internet Explorer which usually make the work easier. Let us explore:
IN MICROSOFT EXCEL
  • To open a new workbook: Press Ctrl+N.
  • To move from left to right or cell by cell: Press Tab, or press the Right Arrow key.
  • To move from right to left or cell by cell: Press Shift+Tab, or press the Left Arrow key.
  • To move down or cell by cell: Press Enter, or press the Down Arrow key.
  • To move up or cell by cell:Press Shift+Enter, or press the Up Arrow key.
  • To move down or up to the last non-empty or empty cell: Press Ctrl+Shift+Down Arrow or Up Arrow.
  • To move to the last non-empty or empty cell to the right or left: Press Ctrl+Shift+Right Arrow or Left Arrow.
  • For Erasing data in the current cell: Press the Backspace.
  • For inserting a return within a cell: Press Alt+Enter.
  • For returning to the beginning of the row: Press HOME.
  • For advancing to the next worksheet:Ctrl+Page Down
  • To go to the previous worksheet: Ctrl+Page Up
  • For entering the date: Press Ctrl+Semicolon (;).
  • For entering the time: Press Ctrl+Shift+Colon (:).
  • To find out the style within the cell: Press Alt+Apostrophe (‘).
  • For displaying the Format Cells dialog box: Press Ctrl+1.
  • For applying the general number format: Press Ctrl+Shift+Tilde (~).
  • For applying the currency number format: Press Ctrl+Shift+Dollar Sign ($).
  • For applying the percentage number format: Press Ctrl+Shift+Percent (%).
  • For applying a border: Press Ctrl+Shift+Ampersand (&).
  • For removing a border: Press Ctrl+Shift+ underscore (_).
  • For hiding the selected columns: Press Ctrl+0 (zero).
  • For hiding the selected rows: Press Ctrl+9.
  • To unhide hidden rows within a selection: Press Ctrl+Shift+opening parenthesis.
IN INTERNET EXPLORER
  • For adding sites to the Favorites
  1. visit the site.
  2.  To add to the Favorites, Press Ctrl+D.
  3. Open Favorites, for creating separate folders or adding the sites to the already existing folders.
  • For selecting a home page
  1. Visit the webpage that that is desired to make the home page.
  2. Click on the Tools menu, and click Internet Options.
  3. Under Home page, click Use Current.
  • To use the History function if few sites are visited frequently.
  1. Press Ctrl+H which opens the History pane.
  2. The site which is frequently visited should be right-clicked and then click on Add to Favorites.
  • For Customizing the toolbar according to the tools frequently used
  1. The command bar should be right-clicked.
  2. Customize should be clicked.
  3. Add or Remove Commands should be clicked.
  • To go to the home page: Press Alt+Home.
  • For switching between tabs: Press Ctrl+Tab.
  • For moving forward through the items on a webpage or the Address bar: Press Tab.
  • To move back through the items on a webpage or the Address bar: Press Shift+Tab.
  • For finding on the page: Press Ctrl+F.
  • To Stop downloading the page: Press Esc.
  • For using the zoom on a webpage
For Increasing the zoom (+ 10%): Press Ctrl+plus sign (+).
For Decreasing the zoom (- 10%): Press Ctrl+minus sign (-).
For Increasing to 100%: Press Ctrl+0.
These shortcuts are very useful for easy access.

function if few sites are visited frequently.
Read More »

How to Know Aadhaar Number Status


Aadhaar card
What is Aadhaar?
Aadhaar project has been launched by Central Ministry of IT and Communication in 2011. So a regulatory body (UIDAI) has been formed to control and implement of Aadhaar Project in India.
Aadhaar is solid identity right for general people especially for them who have not any identity certificate of recognition still now. Aadhaar is form of 12 digit number which will get to all peoples of India. This unique identity number will be valid in whole country for getting different types of government facilities and to express citizenship. This identity number will be available free of cost.

Benefits of Aadhaar –
With the help of Aadhaar number, you can get following government sponsored facilities and advantages easily –
  • Employment or jobs
  • Opening Bank Account
  • PDS facilities.
  •  Health Services
  • Admission in schools or institutions
  • To purchase new SIM card for mobile phones and many more.
How to get Aadhaar number?
For getting Aadhaar number, every people has to provide their details during enrolment at the enrolment center. Two types of details such as demographic (personal info) and biometric (capturing face photo, iris-scan, fingerprints) will be entered by enrolment operator. After successfully enrolment, people will obtain print out of acknowledgment form including pre-enrolment number. Although it is not permanent Aadhaar number.
How to check Aadhaar number status online ?
UIDAI has given facility to know status online of Aadhaar number. People, who have enrolled for Aadhaar number 60 to 90 days before, may check out.
  • To do it, at first, click on below link.
  • Then type pre- enrolment number (14 digit) along with date & time from their printed acknowledgment form.
  • Now it shows such information - dispatching date of Aadhaar generated letter by India post to their respective address.
 Check Aadhaar Card Status online  from UIDAI websites 
Know Aadhaar Card Status         from India Post 
For any complaints or enrolment objection, people can report to online, make call on toll free number or send email also.
To see more details about UIDAI and Aadhaar  project                              click here 
Read More »

Increase Your Windows Laptop Battery Time By Optimizing Usage


While laptops emerge it has been believed an enormous mode to continue your work each time and everywhere. The laptop has added whole functionality like desktop computer. It has become more popular due to provide long time battery backup. But sometimes laptop users have to take attention towards their battery performances so that it could work for long time.
Now helpful software for each window versions named Battery Optimizer has released that optimizes your laptop battery with the purpose of extend or increase the battery life. The Battery Optimizer software examines your laptop hardware components, installed software and gives ideas to you about save the battery.
Read More »

How to speed up your Computer


boost your computer speed
Sometimes you feel that your personal laptop or desktop computer is not working with genuine speed. As a result  all installed software and personal files spend more time to run. Several things causes computer to be slow down. These are
  •  Old hardware configuration and plugged in components,
  •  Suddenly attack of risky virus,
  •  Invalid files management,
  • Various insignificant software on computer,
  • An unnecessary temp file.
In this posts, I am going to present some tips how to get faster your computer or laptop.
1. Disable useless programs and computer services from start up -
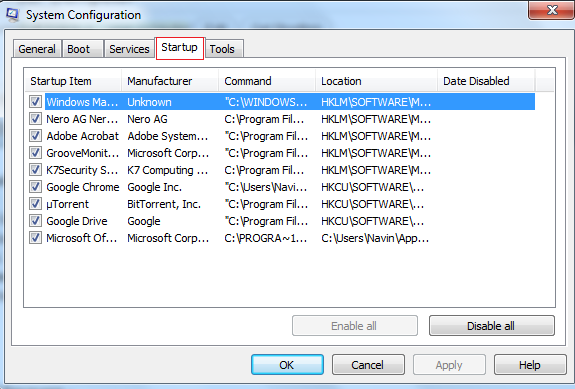
When you get desktop screen starts in loading windows operating system, many installed software run automatically along with in system tray of left corner. Thus in running all programs as well as computer kills more time in starting new task. To disable unnecessary software from start up task, go to RUN and Type command  msconfig.
Then a new window will appear and click on startup tab. Now uncheck the tab of useless software that you do not wish to run during start up.
windows msconfig command image
2.  To Wipe out Risky Virus and Spyware –
As soon as your computer infect from virus then it become slow down swiftly. There are numerous harmful viruses, which repeatedly produce executable file and occupy unwanted storage of your system hard disk. Due to these virus,  your computer installed main hardware device like (RAM, CPU and Hard disk) does not work with actual speed.
Other hand, Spywares runs automatically in your computer through internet. Then harmful effect creates troubleshoot in the computer memory especially in the RAM. Then best option for you to run licensed Antivirus on the virus hinted computer shortly.  To beware from spyware attacking you should surf internet through trusted internet browser like Mozilla Firefox or Google chrome.
3. Often perform actions of disk cleanup –
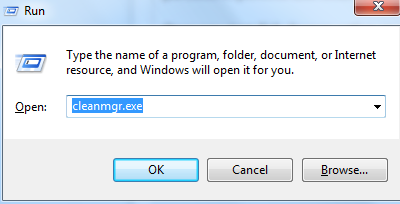
To do it, at first launch RUN dialog box and type command - cleanmgr.exe here.
cleanmgr.exe command in Run
  • Then a pop-up window will appear where you can choose your preferred hard drive partition to perform disk clean up actions. Finally click on OK button.
disk cleanup action
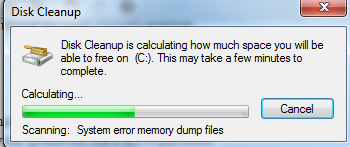
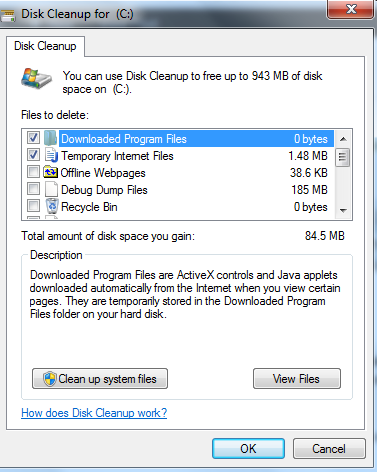
  • Once you start disk cleanup action on your computer, it will remove internet temp files, system temp files and many more unused stored files.
disk cleanup begin
disk cleanup windows of system drive
4. Configure BIOS settings for quicker load during computer startup -
Normally BIOS setting page is launched by pressing either DELETE or F2 button. Although some computer manufacturer company provides another option to launch BIOS setting window. So you will have to take attention carefully on startup screen to know option of BIOS setting while you press power button.
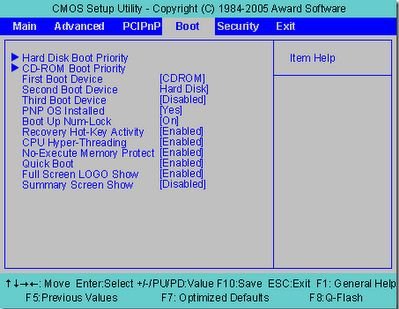
Once you will get BIOS Setting page, look for Boot option or Boot settings or Boot device priority . Here you should set first boot devices like Hard disk in place of CD /DVD device for quick booting during computer start up.
bios boot pariority set
5. Uninstall un-important software -
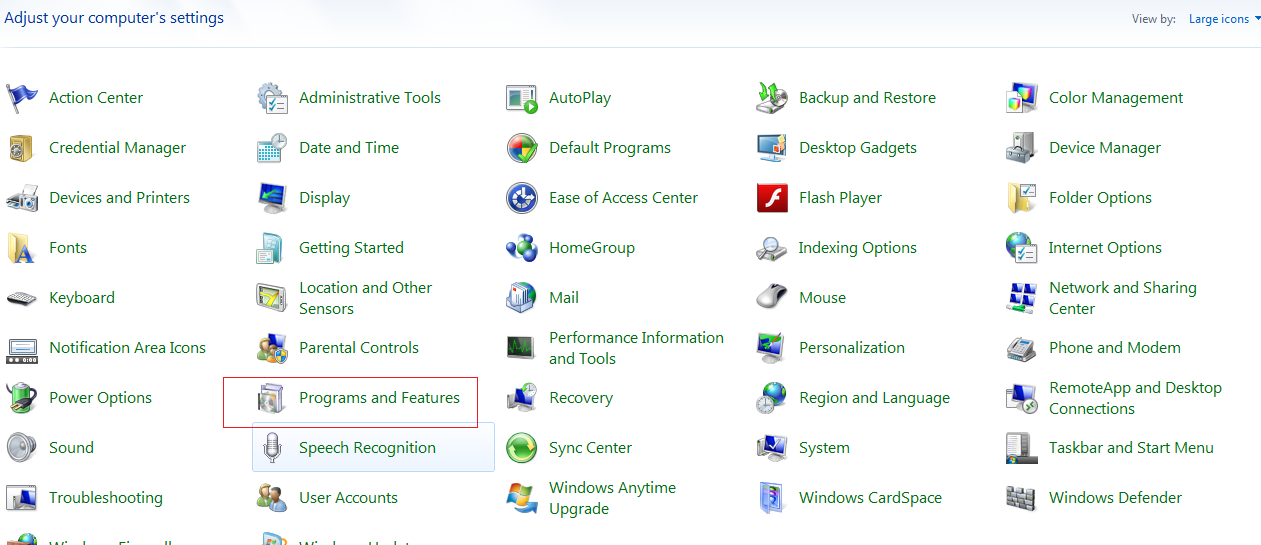
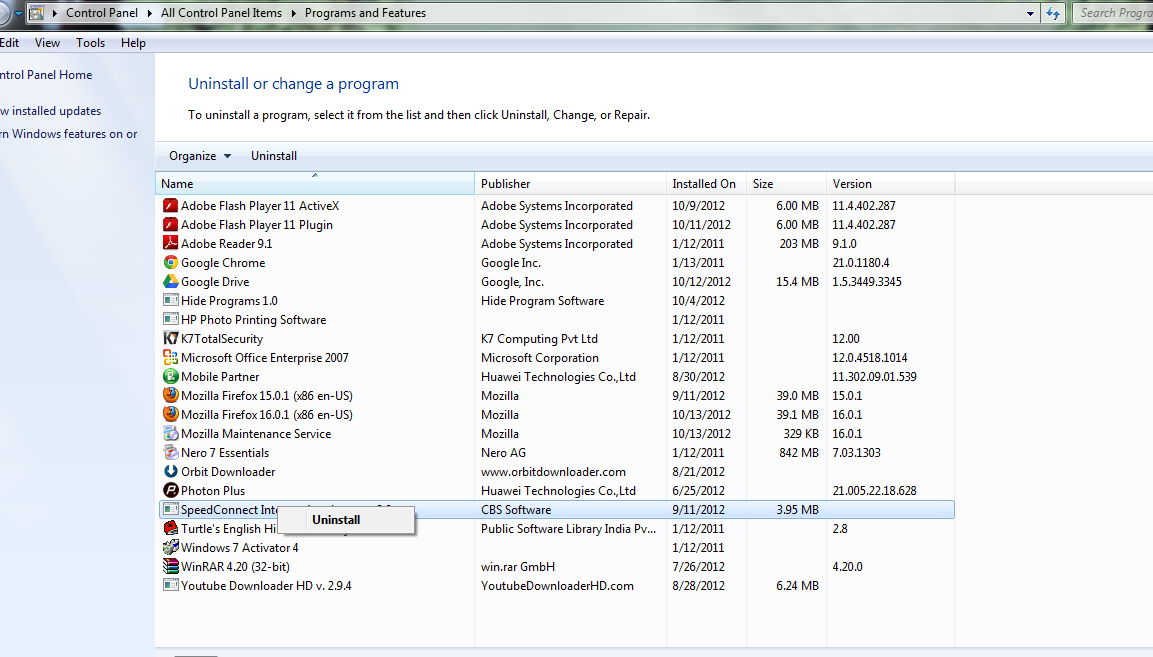
To remove unnecessary installed software is one of the best option for you. It helps you to speed up your computer performances for long time.  To do it, go to control panel and choose add/remove programs option. Then remove the useless installed software that you do not want.
control panel add or remove program option
uninstall program
6. Change time out value on your boot menu of start up 
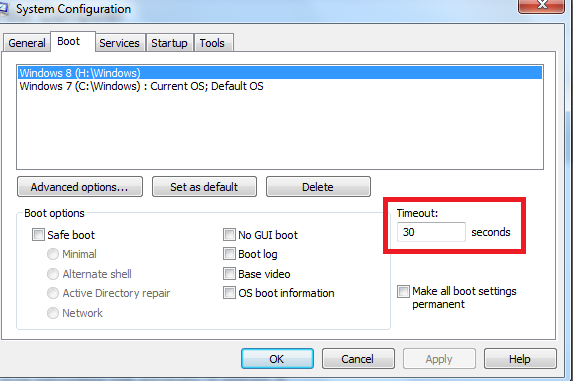
If you have installed two operating systems in your computer then you need to set time out value of start up. It displays 30 second default. So you can also reduce the time out value so that your computer could be loaded quickly. To do it, from RUN command type command - msconfig. Now choose BOOT tab and change the time out value ( 15 seconds in place of 30 seconds)
reduce timeout from boot configuration
7. Defragment your computer
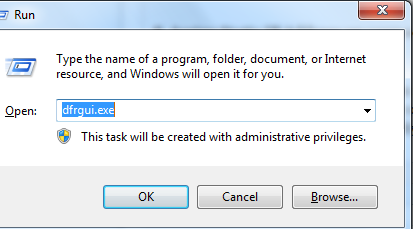
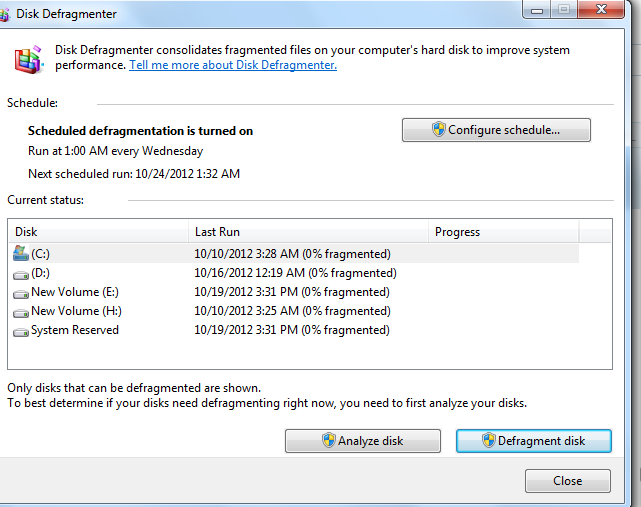
If you run defragment tools occasionally on your computer, it will sort out your personal files and folders in well-managed mode.  Then you can boost your computer speed largely. To start defragment tool, go to RUN and type command - dfrggui.exe. Now select your computer one by one and hit on Defragment disk  button to begin it.
defragment command
disk defragmenter window
8. Assign Static IP Address on your computer under Homegroup Networking
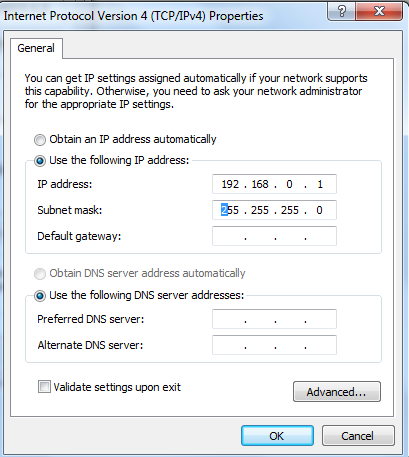
While your computer has been connected from home-group networking with automatic IP address, it searches network address default. Then your computer does not work quickly. If you insert a static IP address that will never modify. Not only it boosts startup time but also increases speed of your computer.
insert static IP address
9 . Configure pagefile size to speed up your computer -
It is used to change value in the Computer Virtual memory so that high resolution supported games could be run easily. To do it,
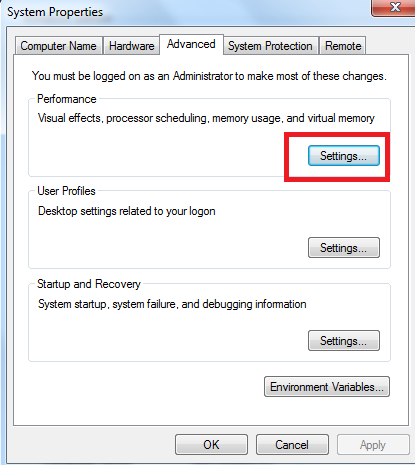
  • At first press right click on My Computer icon from desktop and choose properties option.
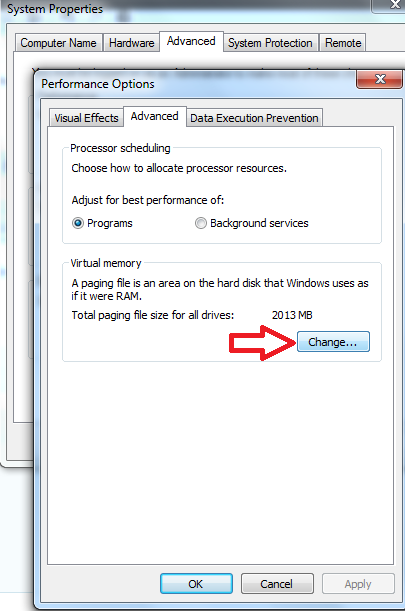
  • Then click on advanced tab and choose settings option under performance section.
system properties image
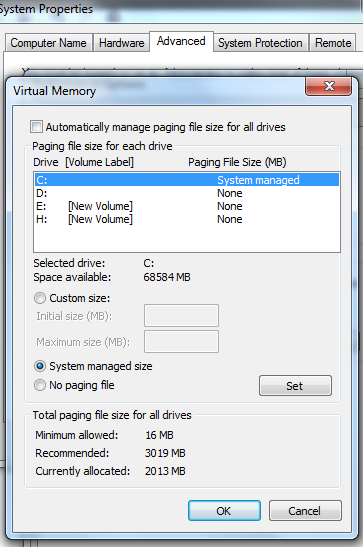
  • Next, click on Advanced tab in new window and choose change option  under virtual memory section.
performances options  window
  • Now set the same value among initial size and maximum size and save it.
virtual memory page file delete
Read More »

Basics of Google. How do we search on it

Google is basically a web search engine, to be more specific the most popular web search engine across the digital world known as ‘World Wide Web’ or ‘ www’. Designed and launched in 1998 by Larry page and Sergey Brin as a successor version of 1996 search engine ‘Backrub’. The main reasons for popularity of Google over other search engines are:
  • Simple and iconic webpage
  • New technologies and innovations upgrading everyday
  • Extent over almost all fields of the Internet World
  • Fast and easy searches
  • A separate window for each type of searches i.e. web, images, news, maps, gmail, etc.
What is Google?
It is the best search engine across the internet world, as quoted by the co-founder and CEO of Google Inc. Larry Page, the “perfect search engine” as something that “understands exactly what you mean and gives you back exactly what you want.”
What are the services Google incur?
Since its release, Google has grown beyond just a search engine. It had incorporated a number of other services such as Email service, You tube, Orkut, Google +, blogs and translation services. Besides this it has also provided us some efficient and reliable apps such as Google Chrome and other mobile and developer apps. Having all this things bundled into one name ‘Google’, the true spirit is still to provide the best in race, Search Engine.
How to use Google?
There are handsome ways of search any content in Google. If you want to Search anything using Google, you can use the following ways-
  1. Firstly, you have to open your internet browser, by clicking your icon on the desktop, or going to Start menu and clicking on the browser icon.
  2. Then type in www.google.com on the address bar.
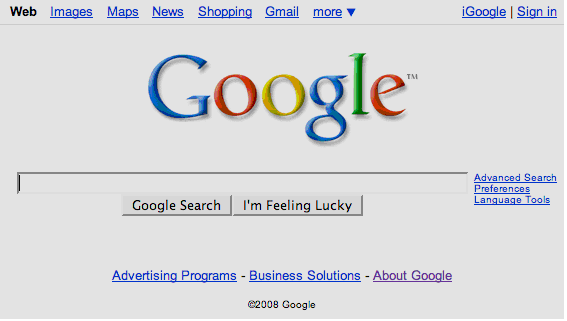
  3. Then you will find a new page opening, with a Google icon on it. Its like-
  4. Now, as you can see rectangular box appears, type the content or the phrase you want to search and click on ‘Google search’ or ‘I’m Feeling Lucky’ option or press Enter (Return) key.
  5. This will take you to the results that you made a search for. The ‘search option’ will take you to a new result page-a web page with lots of similar results and so will be done when the enter key is pressed, but the ‘I’m Feeling Lucky’ option takes you to the most accurate site that you have searched for, most probably the first result of the Search option.
This was the basic Google Searching.
What are other ways of searching Google?
If you have browsers such as Internet Explorer 6+ on Windows XP SP3/Vista/7+ then for more speed and convenience you can directly download the Google toolbar for searching the web. For this you need to follow the steps below-
  1. Open your Browser and type in there http://www.google.com/toolbar/ie/index.html .
  2. This will take you to the Google Toolbar webpage. Then click on Download Google Toolbar
  3. This process open a new webpage saying Install Google Toolbar, now click on Accept and Install.
  4. This will initiate a self setup Google Installer. Let it work. And after successful installation you will find a new dialogue box appears saying Restart Now and Restart Later
  5. Save all unsaved works and then Click on Restart Now.
  6. Now after restarting your computer you will see that Google Toolbar is installed on your browser, ready to conduct searches.
Enjoy the ultimate services of Google.
Read More »

How to make bootable pen drive for installing XP

When our computer or laptop plugged DVD –writer is not working and windows XP have corrupted at this time. Then important and effective solution quickly about same problem to make USB bootable for Windows XP Install. Through it we can install and format XP without any hurdle.

Actually, we know very well that window XP Installation CD known as  bootable


Modified How To Format Computer and install window XP ?


When you feel Windows XP is not accessing in proper mode due to invalid system configuration, virus attack, loss of system file, computer speed slow than actual speed etc. Then you want to format computer drive and re-install windows XP. At this time you will have to kind attention about important things and follow instructions before format XP.

  • At first, you should have Fresh Windows XP bootable disc (CD) with valid product key.
  • Before starting Installation process Windows XP, you should take backup or save all valuable files, data , etc in USB pen drive or external hard disk .

Step wise step of installation Windows XP :-

  •  Insert Fresh Windows XP bootable disc in DVD drive and reboot computer.

  • When computer  shows Startup screen window,  Open BIOS setting according to motherboard setting . Now select boot setting under boot option – First Boot Device – CD ROM , save it by press F10 button and exit BIOS.

  • After reboot computer,it displays black screen with message “Press any key to boot from CD” and press enter button quickly without any delay for starting Windows XP Installation setup Process.


  • Windows XP Installation setup Process will start and happen in few minutes. When this process end, it shows new message -  “Agree to the terms and conditions”, press F8 – I agree here.


Here installation process of windows XP displays with these messages. 

  • Press R –     Repair of previous installed Window XP
  • Press ESC – Fresh installation of Window XP
  • Press F3-    Quit here from Window XP Installation Process


Select ECS button to keep continue installation process, now drive partition of plugged hard disk is showing here.

  • C:  Partition 1 (NTFS)    -   4056 MB (2385 MB Free)
  • Choose Enter button.


Next window ask to format your computer. Choose format (quick)


Format process will start.


  •  When default drive (C :) format process will complete in few minute,  Now copy of windows XP  files will start.


  • press Enter button for asking reboot computer after finish of copy files.


  • Now your computer will reboot and don't try to hit any key on keyboard during displaying  message – Press any key to boot …...
  • Setup of installation process will start.


  • During run installation Process, It shows as – Regional and Language Option  , hit Next button


  • in new  (Personalize Your Software) window, Type  information in name and organization box according to your opinion. Click Next . 


  • Next window ask to enter valid license product Key (20 digit). press Next button.


 (Mostly preferred valid license key of window XP all versions-

RHKG3-8YW4W-4RHJG-83M4Y-7X9GW).

  • New window ask to enter computer name and Administrator password according to your opinion. If you do not want to take action here,  leave blank and select Next button.


  • Now enter current date and Time with correct Time Zone and select Next


  • Choose correct network setting as check on Typical Setting option and click Next


  • Now set workgroup computer domain setting and select No and click Next


  • in new window Select any option and click Next


  • Here enter any user name in showing window and click Next  


  • After installation process of windows XP has finished, Now reboot computer automatically.
  • Your windows XP is loading in Startup after rebooting.


  • Now windows XP  welcome screen has come on screen.


Now enjoy after installing fresh Windows XP in your computer.
Read More »